


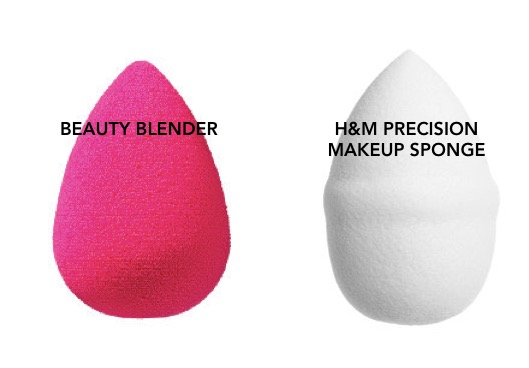
I have a love affair with my Beauty Blender. I am always switching up my beauty products, however I rarely stray from my beloved Beauty Blender for long. I have tried numerous imposters, but nothing has come close to this magical sponge, until now. Beauty Blender Dupe, I have found you…
The dupe is the new H&M Precision Makeup Sponge that retails for $3.99. The cost of a Beauty Blender is $20, making the H&M version 80% less, a HUGE savings!
The H&M Precision Makeup Sponge is identical in size to the Beauty Blender, however when dampened the H&M sponge is about 15% larger. The actual dampened size doesn’t make a difference in the end makeup result, however I thought I would mention it.
In checking what each of the sponges was made of, the Beauty Blender states that it is made of non-latex foam while the H&M sponge is made of 100% polyurethane, which does not contain latex as well.
All in all, I would definitely give the H&M Precision Makeup Sponge a try. Even if you hate it you are only out $4 (there is a $5.95 shipping fee, but shipping is free on H&M if you spend $50+). I definitely think it is worth a try. I would love to hear how you like it.

Have you ever slaved over a meal to only have your family either not eat it or simply give you that indifferent look while they force it down? If you haven’t you’re lucky, however unfortunately I have had this scenario happen to me more than once. So, I can’t begin to explain my shock when I made this Super Simple, Fast, Budget Friendly Spaghetti Bolognese that my crew loved. In fact they claimed this was the best bolognese I have ever made. Uh, ok…noted, I will never slave over my more complex bolognese sauces in the future.
So let me explain how this easy recipe came to be. I became discombobulated and dizzy on Monday. I thought I was just experiencing a bad headache, however when I continued to feel like I was on a moving boat on Wednesday I decided to go to the doctor. I can’t tell you how relieved to find out I had vertigo. All I can say is I was sooooooo relieved to be diagnosed with a medical condition and know that this was not all in my head.
Since I wasn’t able to get to the grocery store for some fresh ingredients (and because my family had not had a home cooked meal in days) I decided to throw together a spaghetti bolognese. Ingredients are simple pantry staples with the exception of some basil, garlic and parmesan I had on hand. There is no lengthy simmering of sauce and because I used 93% lean ground turkey the meal was low fat as well.
So here is my recipe for Super Simple, Fast, Budget Friendly Spaghetti Bolognese. I hope you enjoy
Super Simple, Fast, Budget Friendly Spaghetti Bolognese
(serves 4-6 people depending on how hungry your crew is)
Ingredients
1-2 T. olive oil
1.25 lb. lean ground turkey
1 – 28 oz. can tomato sauce
1-4 garlic cloves minced (I use 4 and it is super garlicky so you may want to start with 1 to be safe)
1 beef flavoring packet from Top Ramen (remove beef flavor packet and either discard the noodles or save noodles for later)
1/2 tsp. onion powder
1/2 – 1 tsp. crushed red pepper, to taste
salt and pepper to taste
basil to chiffonade
parmesan
1 lb. spaghetti*, cooked according to package directions (reserve about a cup of the cooking water)
*I use gluten free, but use whatever you have on hand
Directions
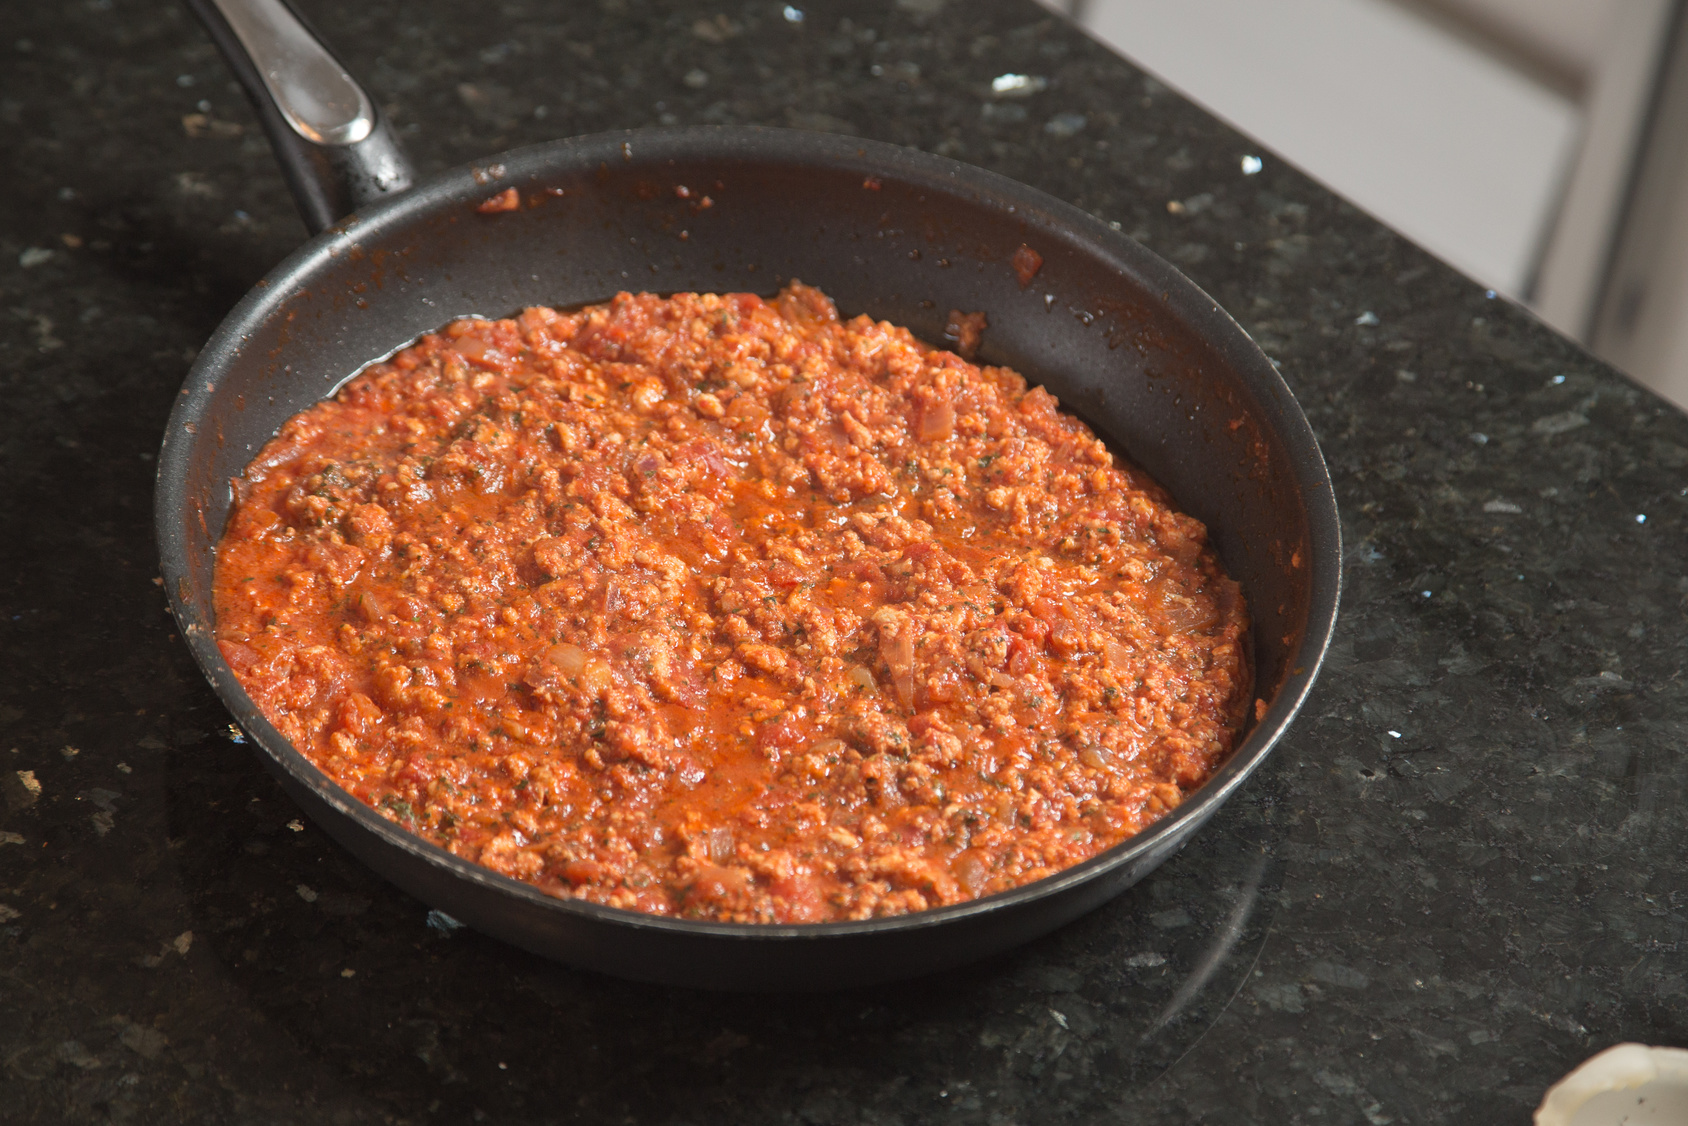
Heat large saucepan over medium-high heat with olive oil. Brown ground turkey (after it cooked, because the meat is so lean I do not drain the fat out, but you certainly could if you’d like).
Add tomato sauce, garlic, beef flavoring packet, onion powder, and red pepper flakes. Simmer on medium low heat about 10 minutes and taste with salt and pepper. If sauce reduces too much or is too thick to your liking, add a bit of the reserved pasta water.
Add the cooked pasta to the sauce and toss to coat. Place in pasta bowls or plates and sprinkle with basil and parmesan cheese.


Let’s talk makeup brush cleaning. I have to that admit that until recently mine have been pretty gross. An example of my short term solution has been to brush them on the back of my hand so that old shades of shadow or blush wouldn’t transfer onto whatever color combination I would apply next. I know, disgusting. However, I decided to make a change to this heinous habit and wanted to share my three tips to my new, hygienic brushes.

The first step is nothing news worthy, but it is simply to cleanse them with a mild cleanser. There are numerous brands out there and Sephora offers many different high end brands which may work well, but my fave is good ole Johnson’s Baby Shampoo. It is gentle and definitely gives my brushes a good cleanse. Nothing fancy, nothing expensive, but definitely effective.
The second step is to soak the brushes in warm, soapy water a for several minutes. After soaking give them a good rinse with cold water until there is no more color in the water you are rinsing the brush in.
Finally the third step is to dry them and this is where I have found the real magic. You see I have always hated washing my brushes (aside from being lazy) is because they never held their shape or felt the same way once I washed them, until now. Enter KLOUD City White Cosmetic Pen Sheath Make Up Bresh Netting, oh and the best part is that you get 40 for only $8.95 on Amazon. All you do is slide these babies over your damp makeup brushes and they not only dry perfectly but the brushes hold their shape. Voila – clean make up brushes that work like new.
 Not only is makeup brush cleaning important in keeping blemishes away, it is also waayyyyy more sanitary. Do you wash your makeup brushes regularly and if so what is your favorite way to wash them? I would love to know.

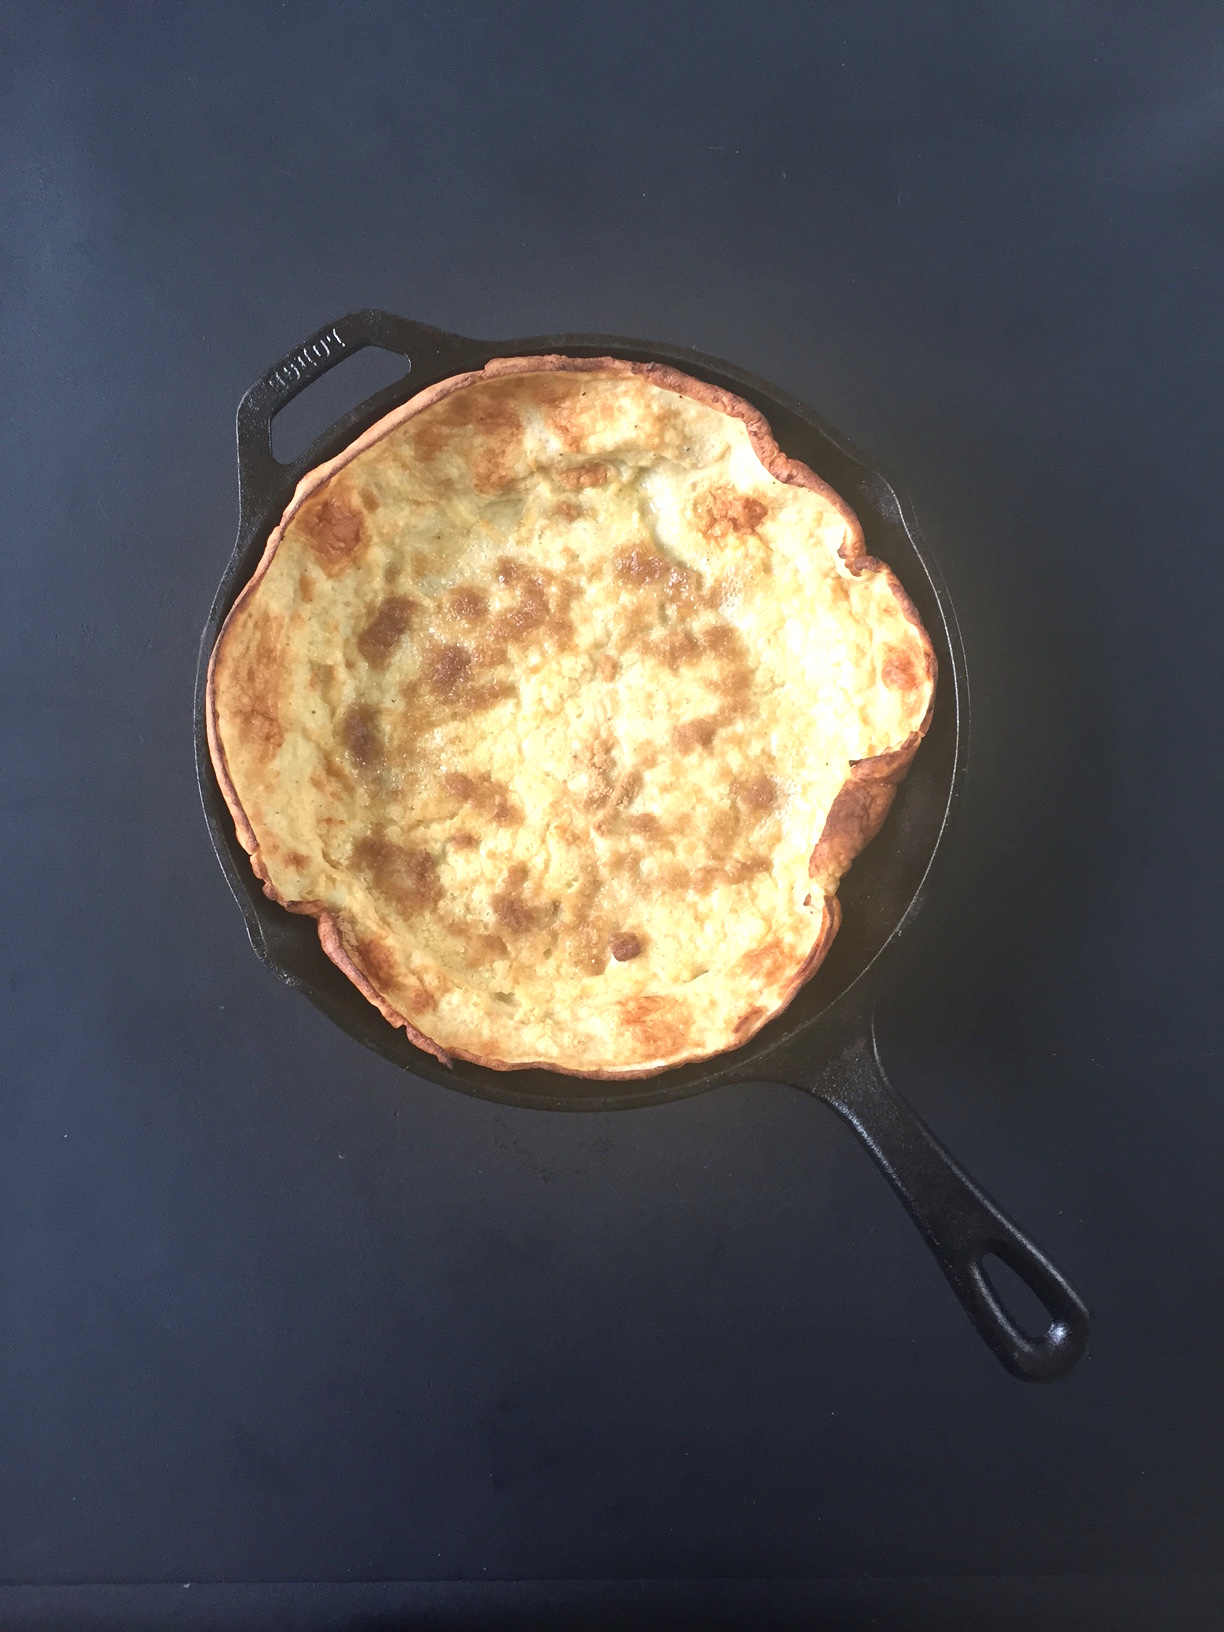
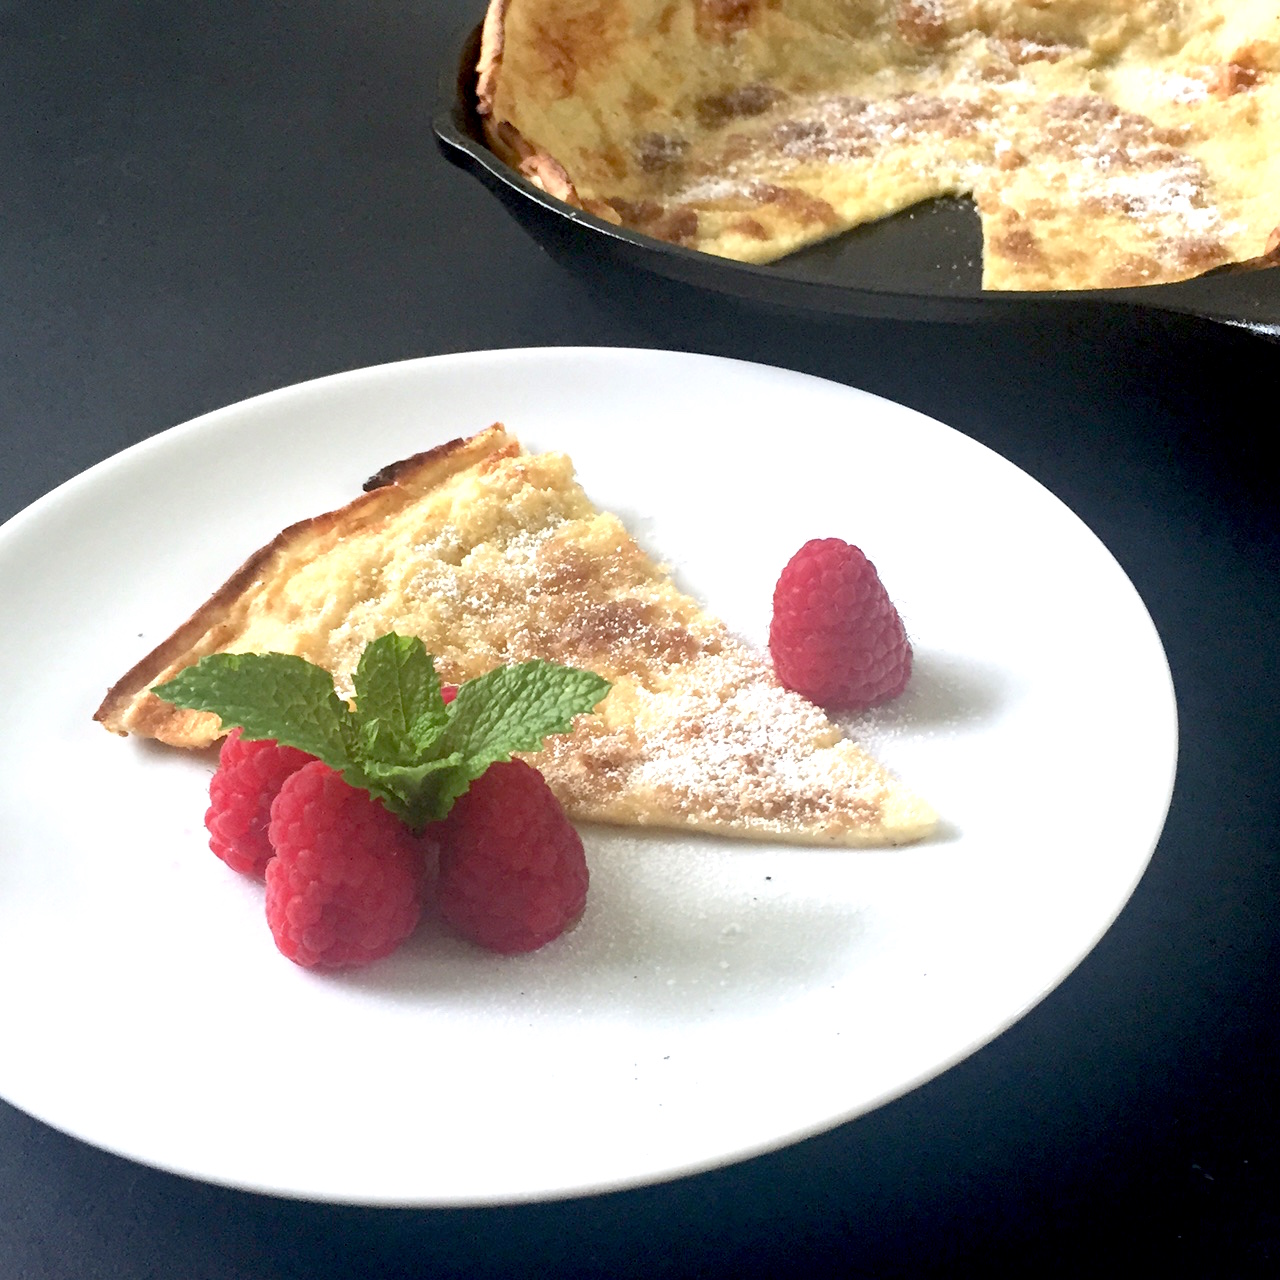
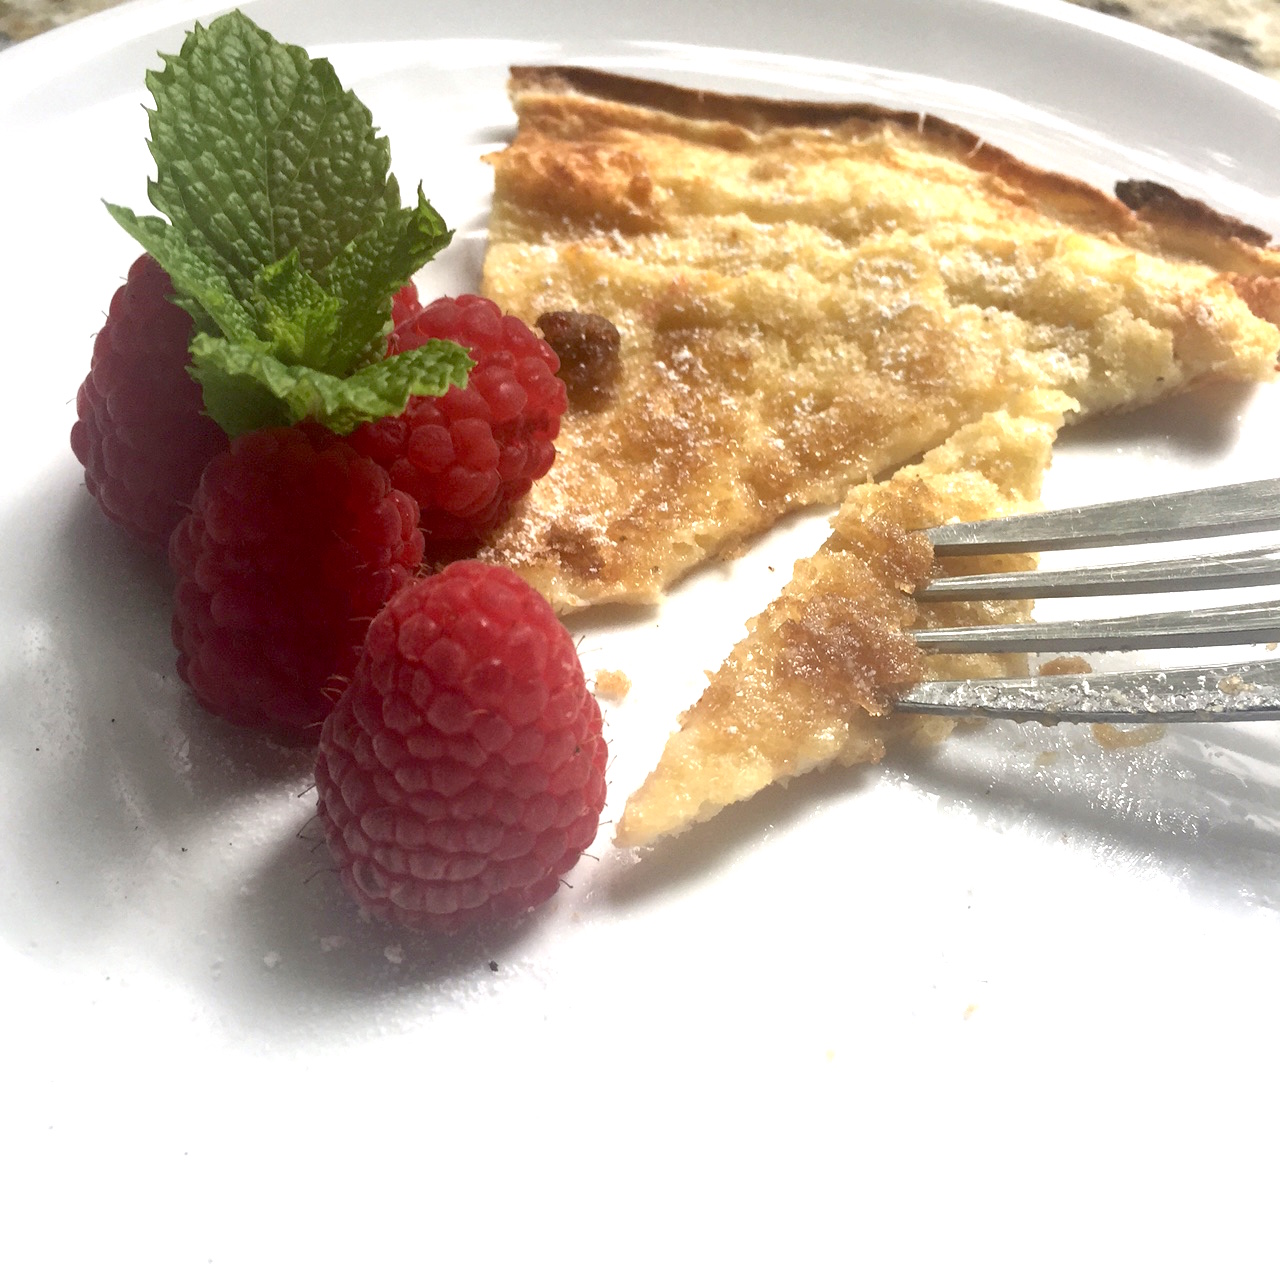
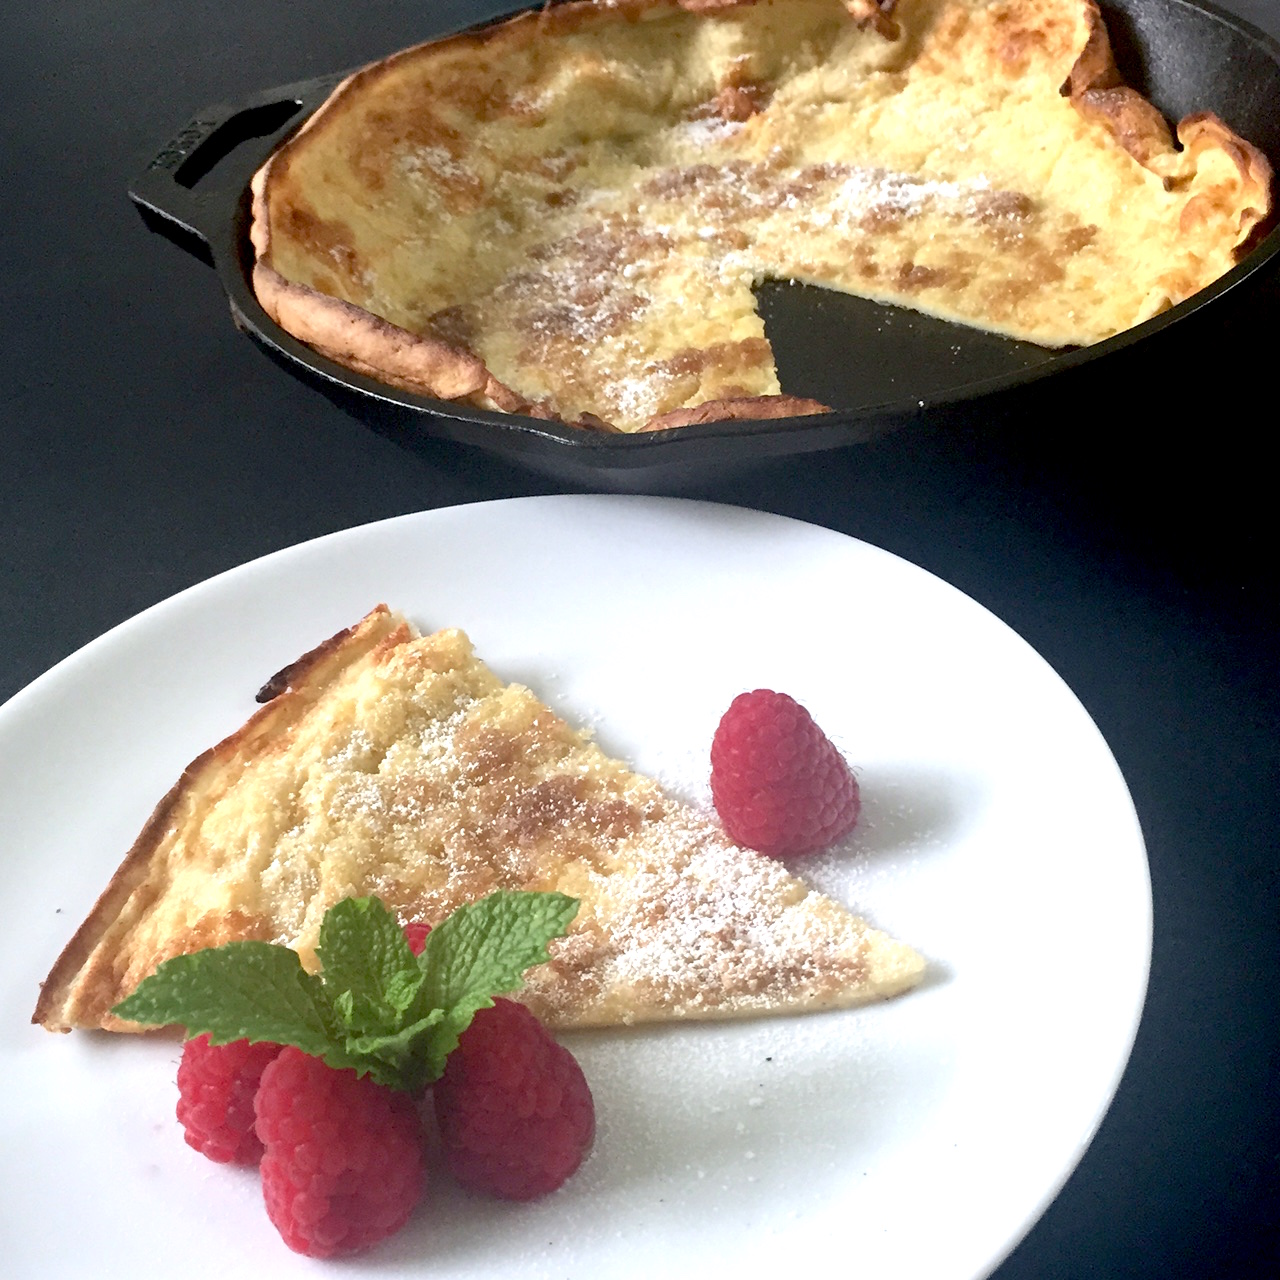
I love when a recipe only uses one pan or pot. As the primary person cooking in my house I am all about less mess which is why I love this Sweet Brown Sugar Dutch Baby Recipe that is made in one pan. For those unfamiliar with Dutch Babies they are similar to a popover, but they are sweeter and are much larger and flatter. This is due to the large round skillet Dutch Babies are cooked in as opposed to traditional popover pans that are deeper and look more like muffin tins.
There are so many reasons I love this recipe, I am just going to list them (after all I do love me a list):
- One pan (yes, stated above but I love this so I am mentioning again)
- All ingredients are those I always have on hand
- This is one of those recipes where countless variations can be made – extra sugar, no sugar, brown sugar, maple syrup, cinnamon, nutmeg, vanilla, powdered sugar, cocoa powder, berries, apples, lemons, lemon zest, orange zest…you get the idea.
- Easy to make
- Looks impressive
I usually make this as a breakfast treat served with warm maple syrup, a touch of velvety butter and some fresh berries. However as noted above, the variations are limited to only ones imagination. One thing to note as that these will puff up in the oven but once you remove the little “baby” from the oven it will deflate as you will see in the pictures below.
 OK, so you need to try making on of these. Not only are they so simple to make, these are so much less work compared to pancakes. Aside from not having to flip flapjack after flapjack I actually prefer the taste of dutch babies with its light, eggy consistency. These are so good (and easy) though don’t just make this for breakfast make it whenever! Lunch, snack, dinner – why not?
Hope you try these and love them as much as my family does!
Sweet Dutch Baby Recipe
Ingredients
2 eggs
1/2 cup milk
1/2 cup sifted all-purpose flour
1 pinch ground nutmeg
1 pinch salt
2 tablespoons butter
1 tablespoon brown sugar
Berries, dusting powdered sugar, maple syrup (optional and to your taste)
Directions
Place a 10 inch cast iron skillet inside oven and preheat oven to 475 degrees.
In a medium bowl, beat eggs with a whisk until light. Add milk and stir. Gradually whisk in flour, sugar, nutmeg and salt.
Remove skillet from oven and reduce oven heat to 425 degrees F (220 degrees C). Melt butter in the hot skillet so that inside of skillet is completely coated with butter. Pour all the batter in the skillet and return skillet to oven.
Bake until puffed and lightly browned, about 10 minutes. Remove from oven and sprinkle the top of the Dutch Baby with brown sugar. Return to oven for two more minutes. Remove promptly and sprinkle with powdered sugar, maple syrup, fruit or whatever you like.
I am a bit of a YouTube junkie when it comes to beauty videos. My absolute favorite type of beauty videos to watch are those called, “empties”. These videos consist of products that someone has used completely and they share whether or not they would purchase the product again. What I love about these videos is I feel that you can’t really gain a complete opinion of a product unless you have used the whole item. I find that the tell tale sign of a really good product is after using it all actually repurchasing or trying something new.
Speaking of products I love, I actually want to start another series of products I tried and hated. But for now, these are products that I have emptied out and my take on whether or not the item is worth repurchasing.
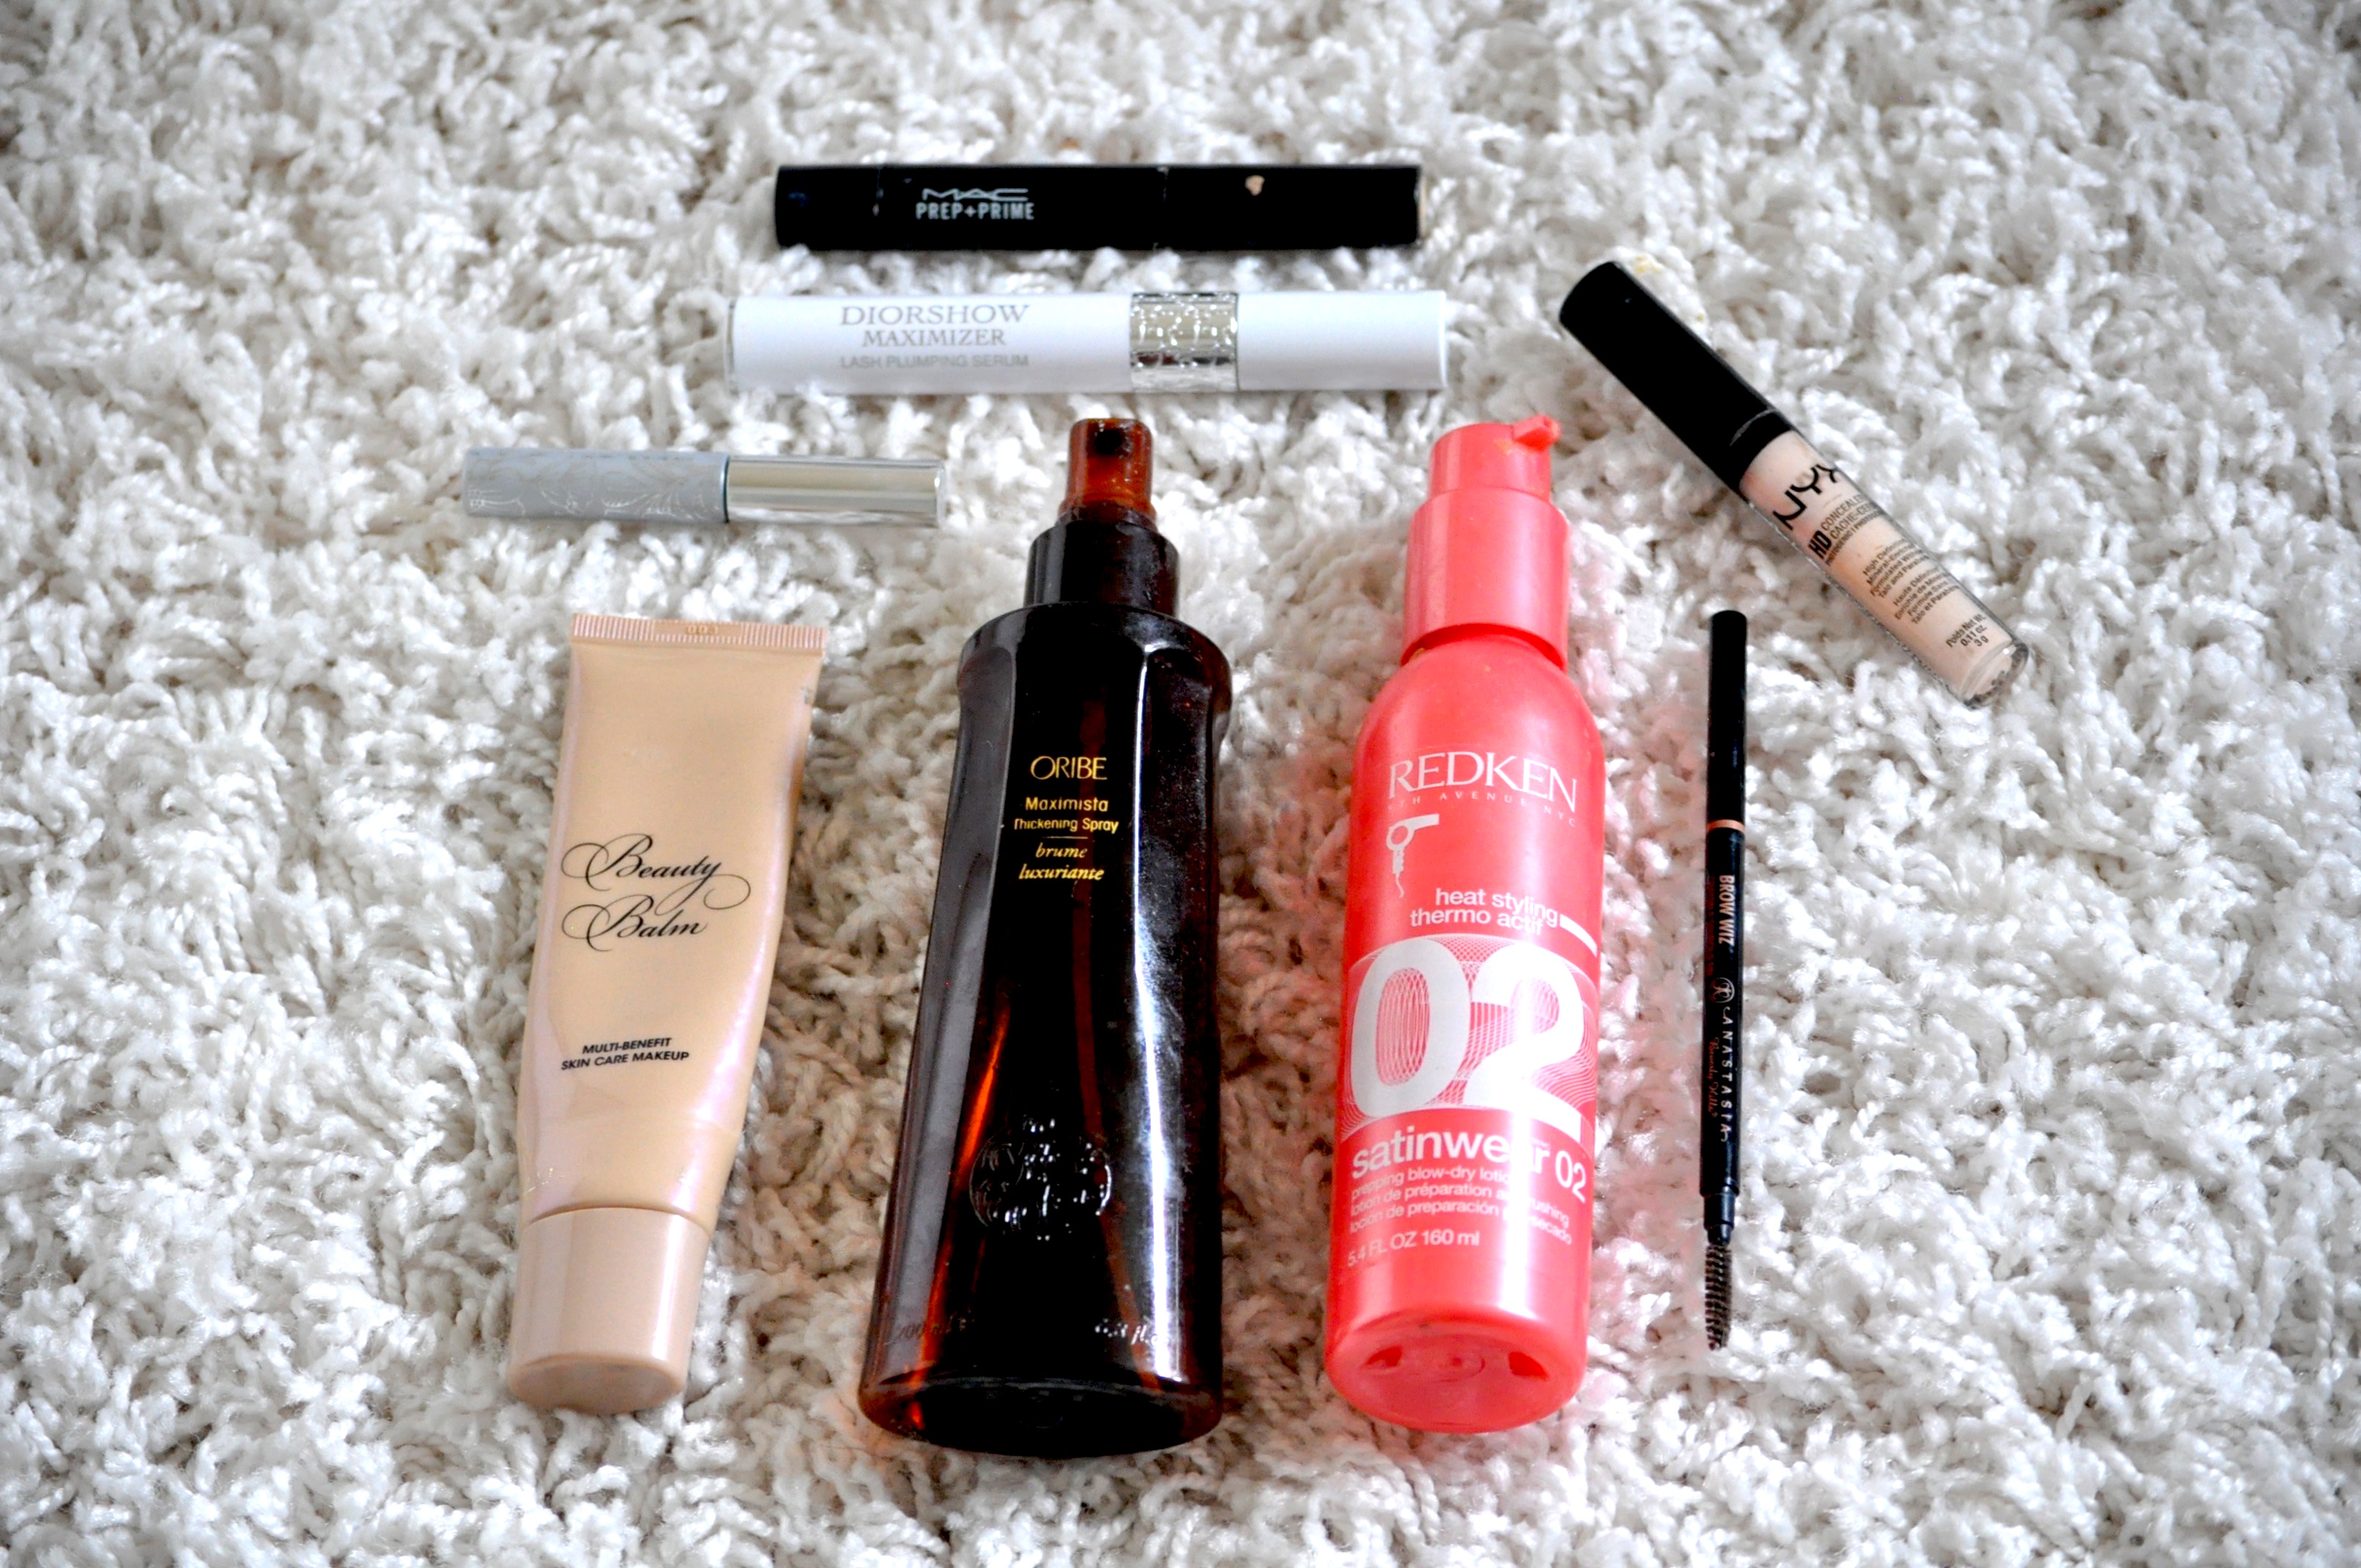
Too Faced Primed and Poreless Skin Refining Face Primer: Potential repurchase, but I plan on trying others first. This product has a tint to it and one of the beauty gurus I follow on Instagram had a picture of her skin using only this primer and not other makeup. She stated something to the effect of, “I can’t live without this stuff.” Her skin looked gorgeous so I thought I would try it. I thought it was pretty good, however my skin looked nothing like the gal on Instagram. Maybe it was a filter, maybe I am just old but I would not be able to wear this primer solely alone if I wanted to have flawless looking skin.
Oribe Maximizing Thickening Spray: Not repurchasing. I thought this worked OK, but not great. At $32 a bottle I want spectacular and I felt something equally as good could be found for quite a bit less.
Redken Heat Styling Thermo Actif: Not repurchasing. This product was just OK, however I wasn’t blown away at all and felt there was no noticeable difference in the condition of my hair.
Anastasia Brow Wiz: Repurchase. I adore this product! It provides perfect precision, a wide range of colors and mine always lasts me a couple of months. For perfect brows it is definitely worth $21 and I have already repurchased this item.
NYX Cosmetics Hi Definition Photo Wand Concealer: Repurchase. I love this concealer! It is creamy, doesn’t crease and has excellent staying power. With a price tag of only $4.99 this is my favorite drug store concealer.
MAC Prep & Prime in Light Boost: Not repurchasing. I liked this product enough to use it up, however at $26 I felt that I should have loved it. I found the NYX concealer referenced above to be superior to the MAC Prep & Prime.
Dior Show Maximizing Lash Plumping Serum: Repurchase. I already purchased another one. Not only does this product maximize lashes no matter what brand of mascara I use, I never have a problem with having my mascara feather of bleed. Even though this item costs $28.5o it does last me a couple of months and I personally feel the investment is worth it.
Clinique Bottom Lash Mascara: Repurchase! Of all the products listed this is my absolute favorite! I love long lashes and this is the only mascara that never, ever transfers to my under eye area. At $10 a tube I always have at least one tube on backup and can’t foresee not using this product in the years to come.
Do you have any items you adore and can’t live without? If so, I would love to hear about them!
